Video Annotation

How does Video Annotation work? We explain how to interpolate annotations in video.

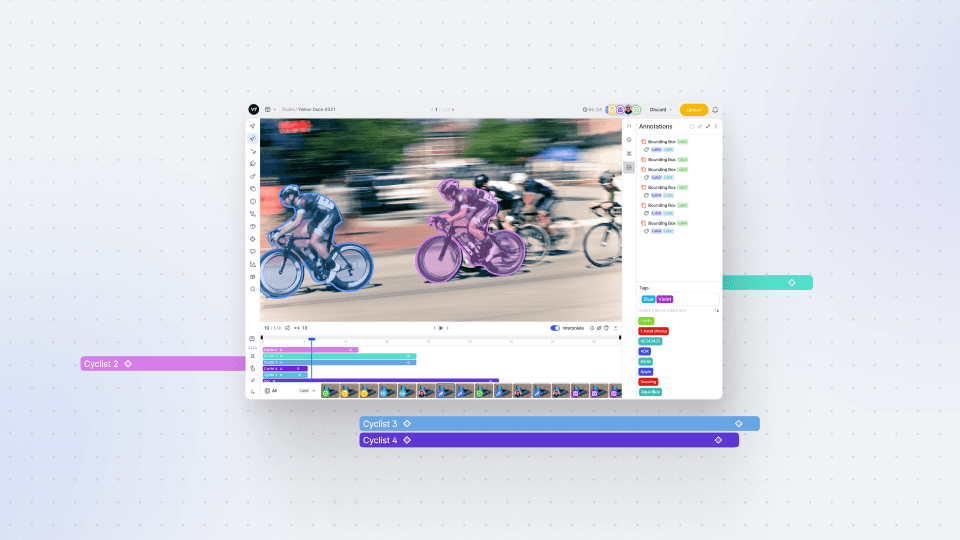
In this Darwin Fundamentals session, we tackle Video Annotation within V7’s Darwin. Whether you’re dealing with long or short videos, countless clips, or individual frames, Darwin is built to streamline the video annotation process for a seamless experience.

Video Annotation, historically, can be a painful exercise. However, we’ve ensured that Video Annotation within Darwin is an easy-to-manage, intuitive, and accurate process.

In this video, we start by revealing the flexibility that comes with video in Darwin, highlighting the various video data types, including drag-and-drag options and CLI commands. We show how users can create their desired frame rate, which determines the frequency of annotation sampling. We also explain how Darwin automatically processes videos to ensure annotations can be performed at the highest resolution - without any image quality loss or frame miscounting.

Next, we dive into Video Annotation, highlighting the stacked timeline (showcasing annotations and when they occur), frame-by-frame labeling, and interpolation - to smoothly track objects over time. We also explore Keyframes in detail, explaining their importance (such as holding valuable sub-annotation information), and how to use them within your project.

You’ll leave this video with a clear understanding of Video Annotation, best practices for annotating within Darwin, and how to leverage the platform to cut Video Annotation time from hours down to minutes. Keen to find out a bit more about Video Annotation for AI? Dive into our 2023 Video Annotation guide.

Video annotation can be a real pain, but we promise it will be a breeze on V7's Darwin platform. Let's jump right in. You can load any form of video data, long videos, short videos, multiple videos, drag and drop them, or use the CLI commands below. Darwin will prompt you to choose a frame rate to sample from.

This will determine how many frames you want to label and how frequently, so if you're working with object tracking or in most videos, choose something like 15 fps or higher. Sometimes, though, you might want to choose something very low. For example, in general, object detection, you could pick one frame every few seconds, and sample images with a much larger variance.

By default, Darwin will assume you want to label a video. But you can also choose to label individual frames. These will be treated like images, and the video will become something like a folder instead. But for this tutorial, we'll focus on video. When uploaded, your video will take a few minutes to process.

Darwin will make sure it can be annotated at the highest possible resolution, that there is no video compression affecting the image quality, and that no frames are dropped or miscounted. This all happens automatically in the background, without you having to worry about decoding or preprocessing any of your image data.

Okay, we're now at the annotation interface. In the top right, you'll see the annotation list that you're familiar with. At the bottom, you'll also see a stacked timeline that shows the annotations and when they occur. Here in the left are navigation controls. You can press the arrow keys to move in between frames or click on these buttons.

Video frames are intelligently preloaded and pre processed, so you'll never have to wait for buffering. You can also click and drag the playhead to scrub through the video and play it at whatever speed you wish by moving back and forth. And whenever you pause, Darwin will load a full resolution version of that frame.

You can click on keyframes to jump to them or anywhere on the timeline to skip to a specific location. We'll get to what keyframes are in a moment. Darwin's video annotation works much like video editing software. Objects appear as events in a moving interactive timeline at the bottom, and you can manipulate them by modifying the annotations, interpolating any changes, or moving them through time.

Every type of annotation within V7 Darwin interpolates, including polygons. But you can choose to switch interpolation on and off at any point. Whenever you apply a change to a label, you automatically generate a keyframe in that point in time. Keyframe indicates that there has been a change to a label, and you can interpolate in between them.

Okay, enough theory, let's get down to making our first label. We'll see the front of this car appear on the edge of the screen, and make a bounding box around it. We can press the right arrow key to advance the frames a little bit, and adjust it to its new position. In this case, we're labeling frame by frame, as this vehicle is changing a lot between them.

However, once it's in our shot, we can start interpolating in between frames and simply drag our bounding box across the screen. We'll play the video and arbitrarily stop it at a point in which we want to move our box. As soon as we pick it up and move it, we will automatically generate a keyframe on this point that indicates that the box is supposed to be here at this time.

We can then backtrace a little bit and make sure that the box sticks correctly to the car. Okay, it looks like we need to extend the duration of this label. You can select the label and click and drag its extremities to extend its duration. We'll make sure it lasts for the entire time the car is on screen.

You can also obviously reduce the duration of a clip or move it around in time. If you do so, the position of frames will be saved, so they continue to represent the point in time in which they were originally created. You can see where these keyframes are by the black diamonds on the annotations. If you need to delete one or create one, you can access the context menu by right clicking on any annotation.

Sub annotation changes also generate keyframes. These are quite useful for attributes. For example, this car may be a sports car for the whole duration of the clip, but it may be turning only for a few frames. You can generate keyframes that hold sub annotation information like attributes, instance IDs, directional vectors, and so on.

And change them throughout the video. Let's complete our car chase over here so I can show you more examples. On the bottom right, you have a keyframe and interpolation control. If this diamond is red, your playhead is on a keyframe. You can click it to delete that keyframe as well. You can also use it to generate empty keyframes.

These are useful to indicate that an annotation should not be moving at all. There is essentially no information in a specific keyframe. As with regular image annotation, you can also hide other annotations or sub annotation information to make sure you've labeled your object correctly. You can zoom in to any point of the video and drag it around while it plays, and watch hundreds of annotations move in real time, even on 4K videos like this one.

Okay, one more feature set. Let's look at polygon interpolation. You can switch on interpolation at any point for polygons and move their respective points to match a new shape. Darwin will not just interpolate polygons with the same number of points, but even ones that have different numbers between the start and end of a video.

This requires some pretty complex engineering work to work smoothly and in real time, so we're pretty proud of this achievement. We've also made sure it works with polygons with hundreds of vertices. And finally, let's see how AI assisted labeling can work in video. Here we're using Darwin's auto analytic functionality to generate these pixel perfect masks of this person walking down a hallway.

Rather than having to redraw this detailed silhouette every frame, all we have to do is press the right arrow key and rerun the neural network to resegment him. And as you can see, it takes less than 2 seconds per frame to generate a pixel perfect instant segmentation with no prior training data at all.

I'll speed up the rest of the sequence. Correction markers are also carried over to new frames that are auto annotated so that knowledge of the object is preserved. And all of this will allow you to label entire videos in minutes rather than hours. The sequence, for example, of this man walking took about two minutes to complete, start to finish.

Take a look at how detailed its segmentation looks. and how accurate the minute changes are in between frames. Our team at V7 is very proud of our video annotation features, and we hope you'll enjoy it too. You can try all of this now at v7labs.com.