Data Upload

How can you upload data to V7? And how can you do it with privacy in mind? Let's dive right in.

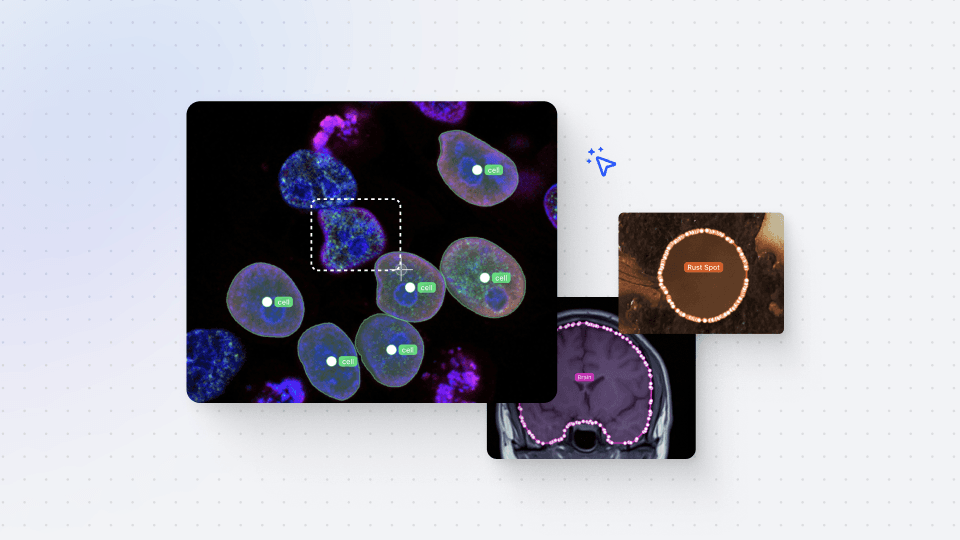
During this session, we will guide you through the various methods of uploading data to V7, the all-in-one platform for efficient training data management and AI development. We understand that handling sensitive data or dealing with unique formats like multi-slot files can pose challenges. That's why we are here to assist you every step of the way.

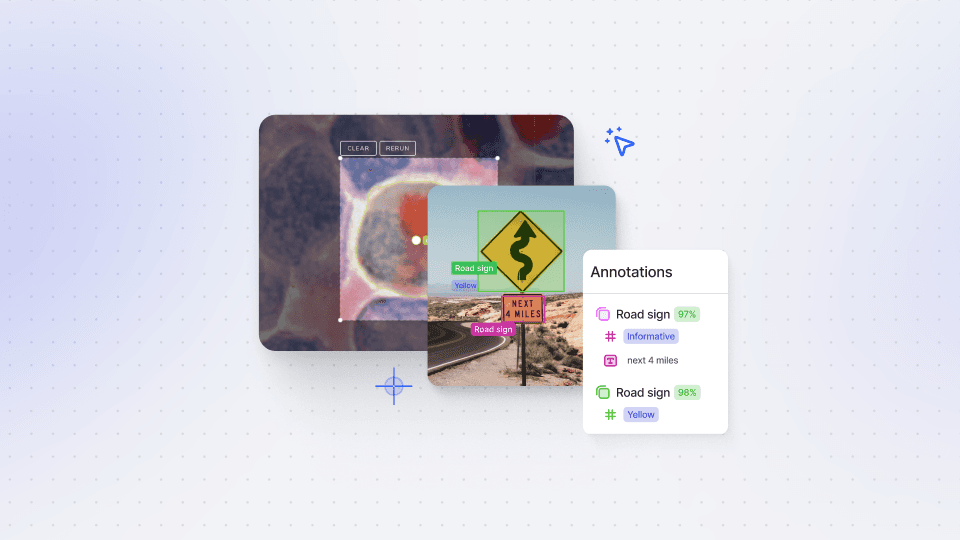
Firstly, we will explore V7's user-friendly interface, where you will learn how to effortlessly create datasets and upload images and videos through the intuitive GUI. You can easily connect your dataset to existing workflows or build new ones from scratch without the need for any coding.

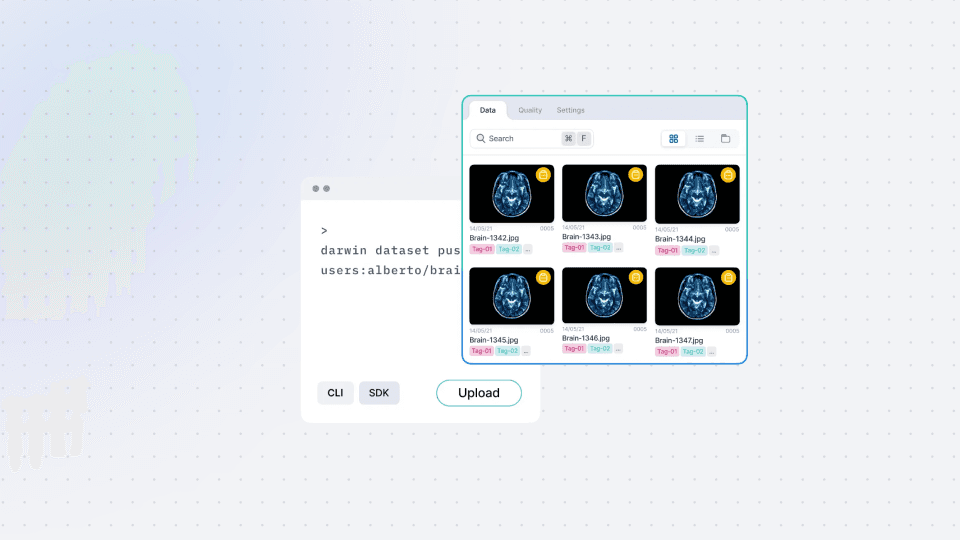
Next, we will introduce you to the command line interface (CLI), demonstrating how to register local data using simple commands. Gain insights into optional arguments for video extraction frame rates, file exclusion, and multiple uploads to enhance your data management experience.

If your data is stored in an external storage bucket and privacy concerns require it to remain there, we have a dedicated method for you. We will guide you through the process of registering files from an external storage bucket directly into V7 using the REST API. This way, you can annotate your data without it ever leaving your secure storage, ensuring the utmost data privacy and compliance.

By the end of this video, you will have a comprehensive understanding of the three different methods for uploading data to V7: UI, CLI, and REST API. Whether you are new to V7 or looking to refine your data management skills, this video will empower you to handle your data efficiently and with confidence. For those dealing with sensitive data or working with multi-slotted items like DICOMs, this video will be particularly valuable, as we address those specific scenarios.

Dealing with your own data always comes with challenges, but V7 is here to assist you with all your data management needs. It's always possible to import data to V7 from the UI and command line interface. But, did you know you can also programmatically upload files to V7 using the REST API as part of your data pipeline?

There’s also no need for data privacy concerns. V7 also enables you to register files from an external storage bucket if your data is for example stored in an AWS S3, GCP, or Azure Blob Storage. This will enable you to annotate your data without it ever leaving your own storage bucket.

But first, let's have a look at how to upload your data using the UI.

Okay, let's start by creating a new dataset, which is really simple. We'll go ahead and click on this new dataset button. The first thing that we need to do is provide a name. Let's call our dataset “Cats”. Now if we continue, we can see that we have the option to click to upload or drag and drop some images in any of our supported file formats.

Here, we already have the command line interface commands that we'll get to in a second, ready to copy and paste. So let's first go ahead and drag in those three images of those pretty cats, and then continue. Here we can create new classes for our dataset, but for now, let's just skip that. We can now connect a new workflow, either one that you've already created or just a new basic workflow.

Here in this dataset view, we can already see that all three images have been uploaded. We can click on one of the images and start with the annotation process, but that is not the focus of this video. Now, I've already teased it, but another very simple method of uploading data to V7 is using the command line interface.

To do so, we use the Darwin dataset push command. We then specify to which team and dataset we want to upload the data and we provide the path to the locally stored data. The optional path argument can be used to upload files into a specified directory. However, if you want to just copy over your own directory structure, you can add a “p argument” to your command and you'll see the folders mirrored within the dataset in V7.

When dealing with videos, you can optionally specify the extraction rate by adding the “fps” argument. When leaving this argument out, you would use the intrinsic frame rate of the video. Finally, to indicate file extensions that are to be ignored from being uploaded, you can use the optional “exclude” argument.

Okay, that was easy.

We can also upload images from our local storage using the REST API.

Okay, let's look at the code and start with the import. Since we're using the REST API, the only import that we really need is the requests library. I also imported my API key which is stored in a separate file, so I just don't have to show you what my API key is.

Okay, then let's get to step 0. Which data do we want to register or upload. Here I just manually specify the paths to the two images that I want to upload, but you can of course loop over your whole directory and collect the paths that way. Then, I also create a dictionary with the file names as the key and the file paths as the value, to easier iterate the images and automate the whole uploading process.

In the end, I will have this little dictionary right here, which has, the name as the key, and the path as the value.

Now we can get to the actual step one. We need to register the data to V7 - we tell V7 how many images we want to upload, and what their names are.

So, for that, let's construct our message that we want to send using a post request. So, the first thing that we need to specify is, of course, the URL. For that, you always have the same URL, but you always need to provide the team slug, the slugified team name and the slugified dataset name.

If you're not familiar with the term slugified, take a look at the documentation and everything should be clear.

So after plugging in the team slug into the url, we can get to constructing the actual payload of the message. We can now iterate over all the items. That's why I've created this nice little dictionary. We then append a list with the following messages or information. We'll have the slots key and we'll here pretty much only need to provide the filename and again have to provide the filename a second time.

This list of all slots will then be added to the payload in the items key and in the payload itself -  we also only need to provide the dataset slot to just know which dataset we want to upload our items to.

The payload will pretty much always be the same. We want to specify what type of data we accept as a response, with what type of data we are working with, and of course the API key for authorization.

After that is done, we can post our payload to the URL including the header. If we look at the response, we can see that we have a list of all items. All items have a specific ID - we can see the name. M

Most importantly, we can see that we have an upload ID for each item. This is important because this is our registration ID that we will then use to sign our upload, to upload the data, and then confirm it.

So, from this response, we want to extract those upload IDs. This is what we are doing in this little loop right here.

So let me quickly just execute the cell.

You know what? Let's just go ahead and also look at this dictionary. We can see that we have our upload ID as the key corresponding to one certain path.

Now we can get to steps 2, 3, and 4, which are pretty much things that you need to do for every single image or item that you want to upload.

Okay, let's have a look at what this is.

So for every upload ID, we have now registered our data. V7 knows which items we want to upload, what they are called and how many.

Now we need to sign the upload and store the upload URL to then upload the data or the file using this URL for the specific item. After this one specific item has been uploaded, we need to confirm this one upload. This needs to be done for every single item. That's why we loop over all of those upload IDs, which are necessary or corresponding to one specific item.

Okay, that might have been a bit fast, so let's have a look at the code in a bit more detail.

Step number two. We first need to sign our upload. So what we have again done is that we have registered that we want to upload two files. We have received a specific upload ID for every single file.

Now we want to sign this one item using this upload ID. We are going item by item. Then with the response that we get, we want to extract the actual upload URL. So we are signing one item that we have registered, and we have got permission to upload the data to this specific URL which we are going to extract.

In step three, we are going to read this one file, this one image, and then upload it using the URL that this image has been assigned. So this is one simple PUT request to the URL and the data is, again, the image. With this response, we will just have a look when uploading it.

Then we pretty much already done. We now simply need to confirm the upload where we just have one specific URL that we need to send a message towards, which again needs our slugified team name and the upload ID. We want to see if this one specific upload or this one image with the corresponding upload ID has been uploaded successfully.

This is really important, you need to do that.

We can see that all the responses were successful, and let's see in the UI if we have successfully uploaded our data. Here it is, Cat4 and Cat5 have been successfully uploaded. Now, that's already pretty cool, but you can also use V7's Slots feature to upload multiple images or files into one item.

The most common use case that we see this feature used for is mammography hanging protocols. However, slots can be used to display any pair or group of files on screen, at once. For more information on that, please refer to the documentation.

That wasn't too bad, was it?

However, if you're dealing with sensitive data, uploading those images to V7 might not be an option for you.

That's why we offer you a solution to connect your external storage bucket and register the images to V7 so that Darwin simply knows where to access the images in your own external storage. That means your data never leaves your trustworthy storage. So let's have a look at how you can register your bucket and your files.

Okay, let's start with the first step of registering your data from external storage: configuring the storage bucket. Doing that is really simple.

We first need to go to our settings and then click on our storage tab. Here, we can here now add a new storage integration.

We then need to select the provider, in this case, let's just go with AWS S3, and we can select a name for our storage bucket. This is the name that we can define ourselves that is then used in V7 itself. The actual S3 bucket name is then provided right here.

Optionally, you can also provide the prefix to the data - for example, when your images or files are stored in a certain directory in your bucket.

We then of course also specify the region that we are in, let's say we are in EU North. We can then specify if we only want to have read-only access, and that's it - we can save our configuration.

After the external bucket is ready, and you have populated it with images, you need to notify Darwin which images you want to list, and for which dataset they are.

This is done via a REST PUT request. If we look at the code for registering files from your external bucket, the code is pretty similar to the just discussed code for uploading images to V7 from local storage.

We again need to authenticate ourselves using our API key. We also need to provide our team and dataset names.

This time we also need our storage bucket name and our header section is the same. In the payload, we now list all items that we want to register.

The path argument tells us in what directory V7 will display the items in the UI. The name argument is the name of the file that you want to register from your storage, including its extension.

The as_frames argument is a boolean value denoting whether you want a video to be registered as a video or as frames. We here provide the name of the slot. We have a whole separate video on slots, so feel free to look at that or read the documentation. If you only have one item in an image, then you can just enter this value as 0.

The storage key is the path to your file in your storage container. For example, you have a folder called “car”, and there you have one image called “cars”. The file name is the name of the file in a particular slot. Note, that this will only be relevant to those with multi-slotted items, such as hanging DICOMs.

Of course, we again need to add which dataset we want to register the files to. We also need to provide the name of the bucket we want to be using.

That's it!

You can add more files in the same structure to this list of items. You can automatically generate the payload with multiple items by looping through all items in your own directory and appending them to the list, given the just discussed syntax.

Now, dealing with videos and read-only access storage is handled very similarly, just with tiny tweaks. Feel free to look at the documentation.

After watching this video, you should be equipped with the most important skills.

Now we're done. You now know how to upload your own locally stored data to V7 using the UI, command line interface, and also using the REST API.

If you don't want your data to leave your storage buckets, you now also know how to register this data, again using the REST API.

Okay, I hope this video helped you with getting started with V7.