Annotations - Getting Started

We dive into image annotation and explain how you can get the most out of these impressive features.

In this Darwin Fundamentals session, we provide a comprehensive overview of annotations within the Darwin Platform. We’ll tackle shortcuts, annotation techniques, layers, classifications, and much more.

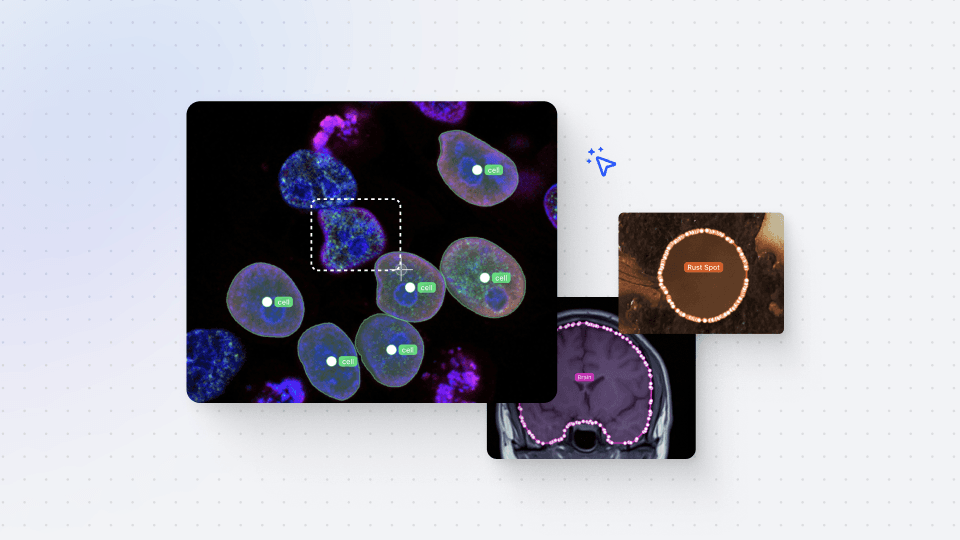
V7’s Darwin is a powerful platform that allows individuals and businesses alike to create state-of-the-art AI models. As an advanced AI engine - with easy-to-use UI - the platform has a number of features designed to advance, fast-track and simplify the process of creating AI products.

In this tutorial, we first tackle V7 hotkeys, allowing you to pan and zoom with W, A, S, and D keys.

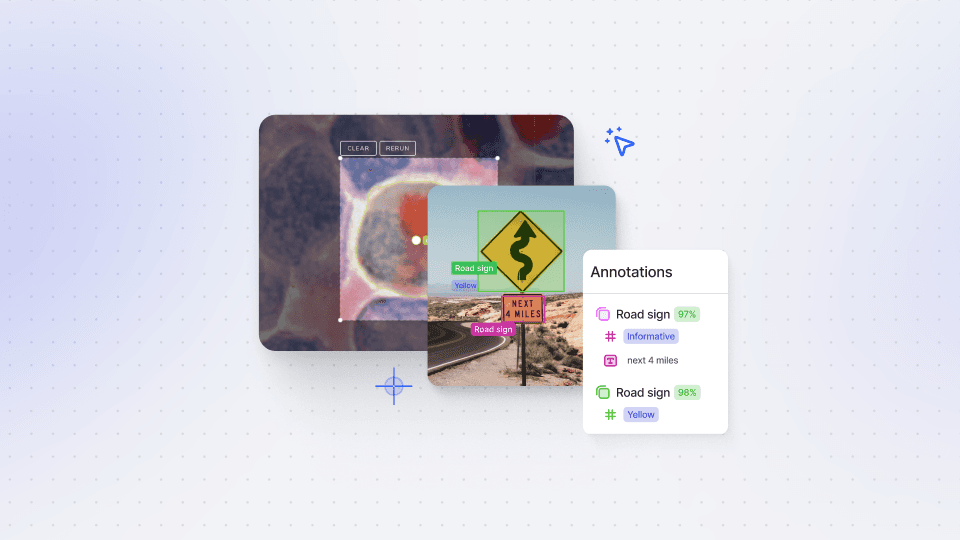
Next up, we dive into annotation techniques, from how to create bounding boxes to leveraging the Auto-Annotate feature. For a bit more detail on this feature, you can head to our Darwin Fundamentals session on the Auto-Annotate tool.

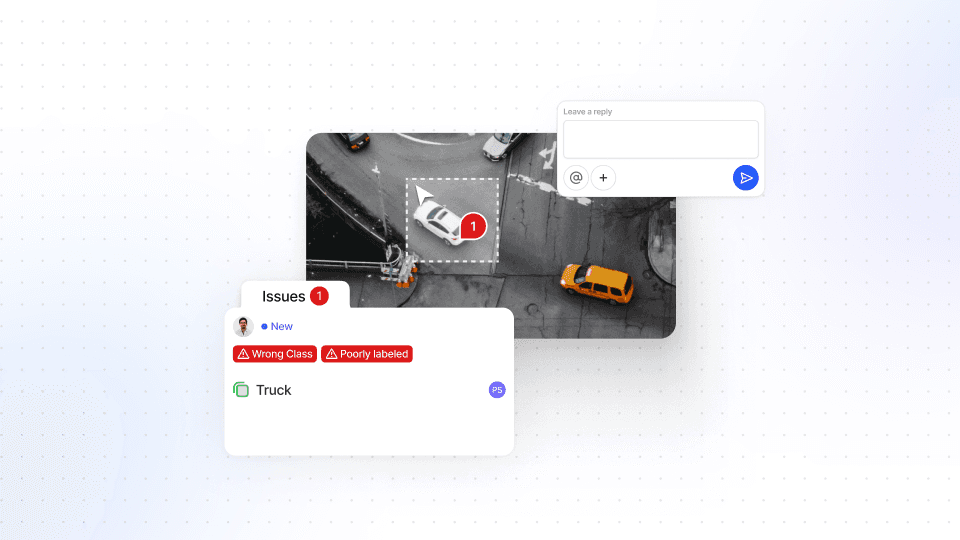
Moving on, we explore layers, which allow annotations to overlap without deletion to provide greater flexibility. Following layers, we explore classification tags (to allow users to add detailed information to their annotations), dataset review (to apply corrections and leave comments), and additional tools native to V7 (such as the brush and eraser tools). In particular, this tutorial will highlight time-saving features, such as copying annotations between images, to get you up and running to leverage Darwin with best practices in mind.

You’ll come away from this video with a strong foundational understanding of the V7 platform, the features it offers, and how you can enhance annotation proficiency, image processing, and dataset management. Searching for something more? You can explore our Annotation 101 session just here.

By the end of this tutorial, you'll know most of the basics of using V7 Darwin. Let's start with camera movements. To pan around, you can press the middle click or scroll wheel on your mouse. Hold and drag and move the image around. You can use the scroll wheel also to zoom in or the shift button and two finger drag if you are on a trackpad.

You can also use the W, A, S, and D keys. Press the Z key to activate the zoom tool. You can click, or shift click to zoom out. You can also drag in a certain region to zoom right into it. When you're done, press zero to reset. When you're familiar with these controls, you can press the period button to cycle to the next image.

Let's start with some bounding boxes. You can press the B key or the bounding box button here on the left. to activate this tool. Let's enclose this lantern by first zooming into it and making sure that we align the crosshairs to make sure that we capture the pixels that only belong to this lantern.

Hold and drag and release and then we can double click on the lantern class to select it. Now we can zoom back out and continue with other lanterns. We can zoom all the way into this one and see the very pixels of the image. And then enclose it in a bounding box. When done, I'll press zero to look at the whole image, make sure I've included all the lanterns and I haven't, but I'll skip it for this tutorial.

And when I am done, I will press the center review button here on the top right, which also has a shortcut of enter or shift enter in some cases. Now let's switch classes. There are many ways to do this. The first one is to simply double click on the label that appears when you're looking at a class. In this case, I can press the edit tool, V, and click on this lantern label here with a double click, and then select the person class.

You can also use this class selector, which is present in every tool. In this case, these are the bounding box classes that we can select, and I can press person. And we'll annotate another person here. You can also use Alt V to paste a class name onto another. And obviously, Ctrl C, or Command C in a Mac, and Ctrl V, or Command V on a Mac, to paste classes.

Get familiar with copying and pasting classes and moving them around. Or repeat some bounding boxes to enclose some additional people in this much larger image. When you're done, take a look at these keyboard shortcuts on the top right by pressing this command button over here. These keyboard shortcuts are going to be essential for becoming a power user in Darwin, and they will save you a lot of time as you get familiar with the tool.

There are many keyboard shortcuts to learn, so make sure you keep referring to this keyboard shortcut panel when you want to improve your speed. When you're familiar with this image, Press the center review button to continue. Now let's start using some polygons. You can press the P key to activate the polygon tool.

Let's zoom into this large car at the front. We can click to add some points and move the mouse to start building a polygon around it. We can click as fast as we need to, to enclose this car. You can close the polygon by clicking on the last vertex, or by pressing enter, as I will do now. Again, since we haven't selected a class before hand, it will prompt us to do so.

I'll select the car class, and it will complete my polygon. Now let's find a better way of making these polygons. Let's use the auto annotate tool. AutoAnnotate is a very powerful AI based tool that knows any class or any object and encloses it with a pixel perfect polygon. Let's select the car class, and by default we will have the generalized model.

This will know practically any object. We'll try to enclose this vintage car next to our other friend here, and it will do a much better job at enclosing it in the first go. But sometimes it won't be perfect. It forgot a bit of wheel, so we will click on this region to include some more pixels. And we'll click again if we want to include another piece.

I also want to include this rearview mirror, so I will simply click and it will expand to include a new object. Let's try it on some other objects, such as this other car,

and you can also try it on other objects that are not cars, simply to try things out, such as perhaps this road sign.

When you're familiar with auto annotate and its command, including the addition of points, The clear button and the rerun, which also activates whenever you resize auto annotate, you can continue to the next image. You can also spend some time here, familiarizing yourself with the polygon tool, as you may use it frequently in your annotation.

Now let's deal with some layers. Layers are used to save you time without having to delete objects that are next to one another. You can simply have them overlap. For example. Let's select the sky class and make a very rough polygon around this image. I will make four points and we'll enclose this image with a large sky.

I'll select the polygon tool again, select the wall class, and I can type in to filter it quickly, and add five points to include a wall. You'll notice that on this panel on the right, wall is now on top of sky. This means that in the JSON order or XML order that we will export the file in, the wall will be placed in a position above it.

In the JSON order, it is technically below. But if you were to export a PNG mask of this image, the wall would be covering the blue color of the sky, therefore being true to what's represented on the image. Let's finish this image off by adding some chimney stacks here. I'm going to press CH to filter to chimney stack, and then start adding the chimney stacks from the back to the foreground.

We'll add the first, the second, the third, and the last one.

Now let's say that for some reason we want the sky to be above all the other annotations. You can click and drag and reorder it to the very front. I'll move it in between the first chimney stack and the second. And to demonstrate how this works, I'm going to ramp up the annotation fill opacity. And you'll notice that the sky polygon is now overshadowing all the other ones.

If you ramp it to 100%, this gives us an idea of how this image will look like as a PNG export. I'm going to move the sky now back to the background. Now that looks a lot better. This new image looks different than the other. It has a yellow border around it saying, Reviewing, and then potentially your name.

This is a review image. It has been annotated by someone before you, and it's now your turn to mark it as complete, or reject it back to them, or apply some corrections and then mark it as complete. In this case, the error seems quite evident. We're going to make a correction, select a dog class for this guy, and maybe just for the completeness sake, we're going to annotate this other dog as well.

And I think that looks like a pretty good annotation to me. What you can also do in datasets outside of this tutorial is leave comments. This will allow you to communicate with the users that have worked on this image with you. In this case, another version of myself. You can leave comments such as mentioning that someone forgot an annotation or that an annotation is wrong.

Note that applying corrections to images in review will affect the score of the person that worked on this image before you. So be mindful of whether you want to apply the corrections yourself or send the image back. Projecting the image with comments provide them with some textual feedback so they may know what they did wrong.

Likewise making a correction will impact their score and allow them to review the image later. Now let's move forward and mark this as complete. Here we have a bunch of horses and if we cycle forward one image we'll notice that this is somewhat temporal. It is not quite like two video frames but there is some consistency with these six horses on the frame.

Let's label one with auto annotate. I'm going to pick this one on the front.

We have an annotation of the horse. Note that there is a figure over here saying 0. This is an instance ID. It is a sub annotation selected for this class that tells us that this is horse number 0, and it is a unique identifier for this horse. This is quite useful if this specific horse may reappear in the dataset and we want to re identify it.

We can also add an attribute to the source by defining its color. In this case, we'll say it's brown. Moving on to the next image, we'll notice that the very same horses have moved around. I can press this copy instances button on the right to copy over whatever annotations were in the previous frame.

The horse annotation from the previous image has reappeared, but it is clearly in the wrong spot. If we want to make a comparison, one handy trick is pressing this reset zoom lock button until it is in the crosshair mode, which will fix zoom whenever we switch images. So if I press comma to switch back, and period to switch forward, I can see exactly where the camera corresponds to in the next image.

In this case, fixing this will be easy. I'm going to move this annotation to the position of the new horse, and press the Edit Auto Annotate button. I'll make an adjustment to the box around Auto Annotate, and it will automatically adapt to this new position and pose of the horse. With one error here, which I can correct by clicking, and having it exclude the head of what is clearly another horse.

We can now compare the two images. and see that there is consistency in the instance ID, which is also marked by a unique set of three colors and obviously the horse itself. You can edit any auto annotate by pressing this button over here, or the shortcut of M for Mike. We have an image here that probably won't give our model any further learning.

It is blurry, you can't really distinguish objects, but before we discard it with this button over here, let's make sure that we're not missing out on anything. Open the image manipulation panel and set the brightness up a little bit. Clearly we cannot see any further objects and I think it's the right decision to discard this image.

We'll click on this trash can and pick motion blur as a reason as it is the most prevalent prevalent error in this image. This image will be set as discarded and will be sent to review automatically. I can either press the period button or press the sending to review button to cycle forwards automatically.

Before you do so, make sure that you press this reset button over here to put the parameters of image manipulation back to the default setting. Otherwise, all the images you will see will have very high brightness. This is also quite useful if your entire data set is very dark or perhaps very low in contrast.

We have a very simple task here. We only need to classify this image with a classification tag. Classification tags are present in the bottom right of the image in this tag applier section. You can simply click on a tag to apply it to the specific image. And you can also type to create new tags. You can press enter or this button over here to create a new underwater tag, which will be usable throughout the whole dataset.

Let's play some sub annotations. These are like annotations on top of annotations, a bit like attributes before or instance IDs. There are many of them available on Darwin. We'll pick the gauge class here and zoom onto this pressure gauge and close it with auto annotate. And then select the directional vector sub annotation over here.

This will allow us to give a direction to this object. Whether it's a person, car, animal. It can set a value between 0 and 365. In this case, we will use it to define its hand. We can also add attributes to it. For example, the fact that its pressure is 0. You can always paste sub annotations to other annotations of the same class by using Ctrl Shift V or Cmd Shift V on a Mac.

Let's move forward. Okay, we will play a bit with the brush tool here. The brush tool shortcut is F. and it has some additional commands on the top. You can increase its size with these buttons, or by using these square brackets, as you would in most image editing software. We're going to zoom into these windows and make a very simple annotation of them.

Note that while in edit mode, the brush tool will always make a red mask. This is because it's not converted to a polygon yet. All annotations in V7 Darwin are stored as vectors. These are both lighter and much easier to manipulate than raw pixel values. To confirm your annotation, press enter or switch to any other tool such as the edit tool with V.

This will prompt you to name this class and we will make it a window. Now that we have this window class, in its instructions, it mentions that if objects are visible through the glass, exclude it. In this case, we will select it and press E to access the eraser tool, which is also available through a button in the brush tool.

When we have the eraser tool selected, we can start editing polygon annotations and create holes within them. We can also create compound annotations with multiple parts. In this case, we will create four holes into this window so that we may exclude the glass. If I want to correct issues such as this, I can simply switch back to the brush tool with F, reduce the brush size, and paint in these pixels of the window.

When I'm done, I can press enter and note that it now has four holes within it. Another tip is to press shift to switch between the eraser and brush whenever the other is selected. We're almost at the end of this short tutorial. The last annotation type that we will play with is text. Let's select a bounding box tool and the printed text class.

Enclose one of these words and then use the text sub annotation to define whatever text is contained here. You can press enter to confirm. This is used in OCR or text detection or simply to add free text to any annotation. Before we conclude, a few extra tips here is that you can hide any annotations by pressing the I button here, or delete them by pressing the trash can.

You can also hide all annotations by pressing this teal colored I, and you can hide any sub annotations, or the colored label of each annotation, by pressing this circle. This may be useful when your annotations start getting really, really dense. Finally, you may have noted that there is a timer at the top.

You can pause this anytime and it will pause automatically whenever you leave this tab. You can also move between images with these top buttons or press undo and redo with these two. Finally, this timeline at the top can be navigated to see how annotations were at a previous stage by simply clicking on it and going into time travel mode.

This will be particularly useful if your annotation workflow has many, many steps. We're at the end of this tutorial where this amazing cat will greet us.

If you'd like to get in touch with myself or any of the developers on the V7 Darwin team, you can always use this feedback button on the left, click on it and enter some text here, you can use this to report bugs or even for feature requests. We implement many feature requests that our users put forward to us.

And finally, if you want to learn from more tutorials like this, you can go on v7labs.com/academy. That is all for now. To return home, simply press this team icon on the top left and it will get, and it will send you back to your dataset panel. Thank you.